Solution for “Windows 10 Display brightness not working” problem. Windows 10 brightness problem is a common problem for a lot of people now. It is a pain when you are outside and want to increase the brightness or decrease it in a dark room, but the brightness setting is not working. Though I can move the brightness bar, it doesn’t have any effect on the monitor or display brightness. For a laptop user, it’s a big problem, because it drains the battery power faster when the brightness is high. These are the solutions that might solve the problem.
Also check: Wifi Keeps Disconnecting Windows 10 Fix
How to Fix Windows 10 Display Brightness Not Working
Updating the display driver
Most of the display-related problems are caused by the display driver. It could be outdated, or the new updated version has some bugs.
If it is an outdated version, then all you need is to update the driver. You can do it in two ways. By using your windows system or by downloading and installing separately for those who have external graphics cards like Nvidia or AMD graphics cards.
- Through windows system.
Again you can do it automatically and manually. We will show both of them and how to do them.
- Automatically
Follow the procedures outlined below to do this.
- Go to “Device Manager.” By searching on the settings search bar or you can use the search bar that is on the bottom left corner beside the start icon.
- Open “Device Manager” by clicking it.
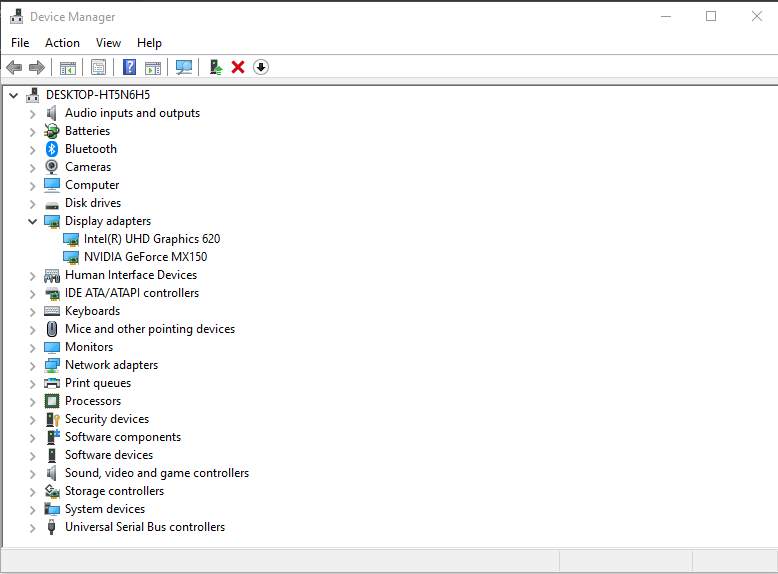
- You will see a lot of options there. Try to find “Display adapters” and click on it.
- It will give you another option. It is going to be your graphics card name. So, for everyone, the name is going to vary. It could be Nvidia…, or AMD…, Or Intel…
- Right-click on that. There will be the option called “Update driver software.” Click that.
- Click on the “Search automatically” option.
- It will search automatically to check your driver’s version if it is up-to-date or not. If not, then it will download the newer version and install it.
The one mentioned is the automatic one. But sometimes, the automatic version doesn’t work.
If this occurs, you must do it manually. It is not difficult to accomplish.. We will give you the steps, you just need to follow them. You may encounter the Windows 10 display won’t turn off when I schedule a specific time issue, but just don’t panic, an answer is on the way.
- Manually
- You have to do all the things the way you did before for the automatic one, till “Search Automatically.”
- Except for clicking on “Search automatically,” click on the “Browse my computer” option.
- Down you will see another option called “Let me pick from ……. Drivers.” Click that.
- You will see two or more options now. Select “Microsoft basic display adapter” and click next.
This will update the display driver if it is outdated. Both the automatic and manual need an internet connection because they will download the new version from the internet.
- By downloading separately
Those, who have Nvidia or AMD graphics cards, can go to the official website of the graphics card and see if there is any new version available. If there are, then install them after downloading them. After installing, this might require a restart.
Rollback to the old version.
Sometimes the new version might have bugs. The bug is from the developer. So, you can wait for the developers to release a new patch or update for the driver.
Again you can just reinstall the old version that you were using until the bug is fixed. With this method, you can use your display brightness again.
Follow these steps to Rollback the old version.
- Just like before, go to “Device Manager,” then “Display adapters,” and then right-click on the GPU you are using.
- Now, select “properties.” The “properties” window will open. Now select the “Driver” tab.
- There you will get the “Roll Back Driver” option. Click on it. The driver will get back to the version it was before.
- But if the option “Roll Back Driver” turns gray, then it won’t work.
It can also solve the problem. Use the brightness control panel to see if it’s working or not.
Also check: Audio Service Is Not Running Windows 10 Fix
Graphics Card Software
There is a high chance that your GPU software has brightness control. The new update of the GPU software or driver might include the brightness control option.
In that case, the brightness control on the windows might not work. You have to use the GPU control panel or software to increase and decrease the brightness.
Just right-click anywhere on the display, and you will see the AMD Radeon software or the Nvidia control panel option. Click on them and try to find if there is a brightness control section.
Intel driver & support assistant
It’s software from intel. Download and install it. It will do a full scan of your computer and will tell you which driver is missing, outdated. You can download or update your driver using this tool.
If there are any drivers responsible for your display brightness program, this tool might solve that.
You can download this software by searching the name “Intel driver & support assistant” or go to the official website, then go to the support section, and you will find that there.
Turn on Adaptive Brightness
This doesn’t work if your monitor doesn’t support adaptive brightness. We put our smartphone’s brightness in auto mode so that when we are outside or inside, our phones automatically adjust the brightness.
Adaptive brightness works like that on some monitors and laptops. These monitors/laptops have a sensor light that helps to adjust the brightness. You can turn on this feature to get the right brightness at the right place.
Follow this process to enable it.
- At first, Go to settings
- After that “System” and
- Go to Power & Sleep.
- On right, you will see “Additional power settings” option. Click on it.
- You will see three options that are: the first one is Balanced, the second one is Power saver, and the last one is High Performance. On the right side, each of them has the option called “Change plan settings.” Click on it.
- Then select “Change advanced power settings”
- It will automatically bring up a window with the name “Power Options.”.
- Search for “Display” and click on the “+” then click on the “+” icon beside “enable adaptive brightness,” then turn this on.

If it doesn’t work, try the previous suggestions if you haven’t already.